| IAP Software ™ |  |
| IAP Software ™ | |
Check In/Out
The Check In/Out form maintains a running log of personnel participating in a response. Each Area of Operation represents a version of the form. The Check In/Out form is used to track daily hours and movements of responders and equipment resources. For help using general form functions (e.g. Create/Open Version, Save, etc.) and accessing preloaded versions, see the General Form Functions page.
Contents
Open and View Check In/Out Data
Manually Check In/Out Personnel
Manually Check In/Out Equipment
Edit or Bulk Edit Check In/Out Data
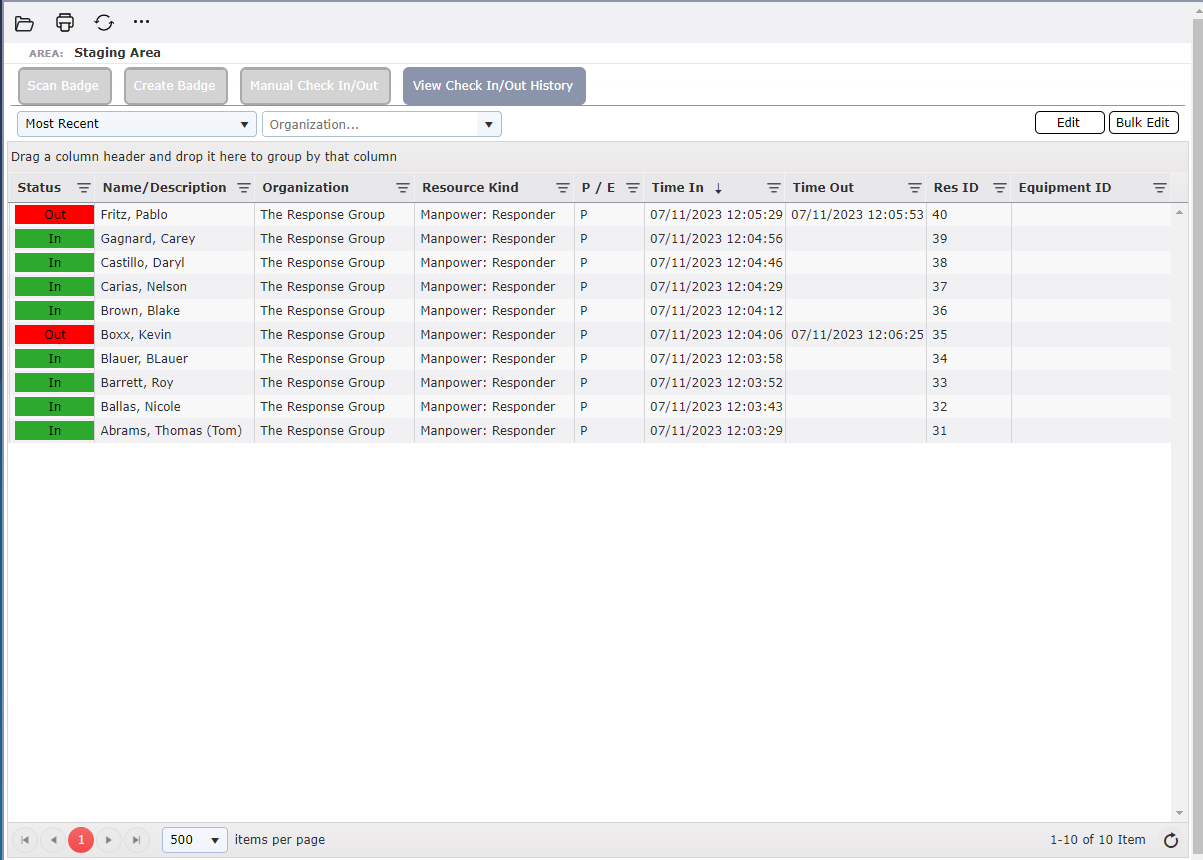
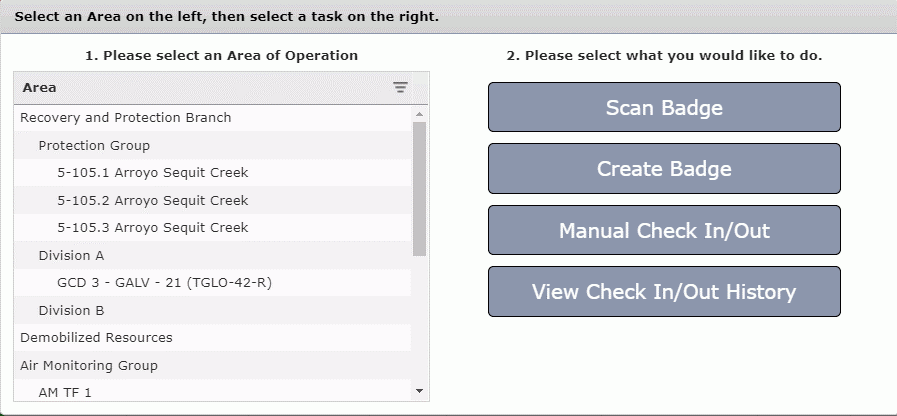
Upon selecting the Check In/Out form to open, the user is presented with a dialog box to choose which Area of Operation to view or enter data. An Area of Operation in bold indicates a populated form.
Select the appropriate Area to open to check in/out personnel and equipment.
Next, select from the four options on the right side of the dialog box. Click on the View Check In/Out History button,  .
.
NOTE: To navigate back to the Select Area dialog box to choose a different Area of Operation, click the Open a different version button  on the menu toolbar.
The list shows check in data with the most recent check in displayed at the top. The list can be filtered and sorted using the options available in the column headers. For more information on sorting and filtering, see the General Form Functions page.
The page defaults to showing the Most Recent entries, with an Organization dropdown. You can use this dropdown to filter through the Organizations listed below.

You can also select a Custom Date Range through the first dropdown. This allows you to set a beginning and ending date to filter by.

After applying the filter options the total number of people who have checked in and out within the specified timeframe will display in the footer, at the bottom right side of the page.
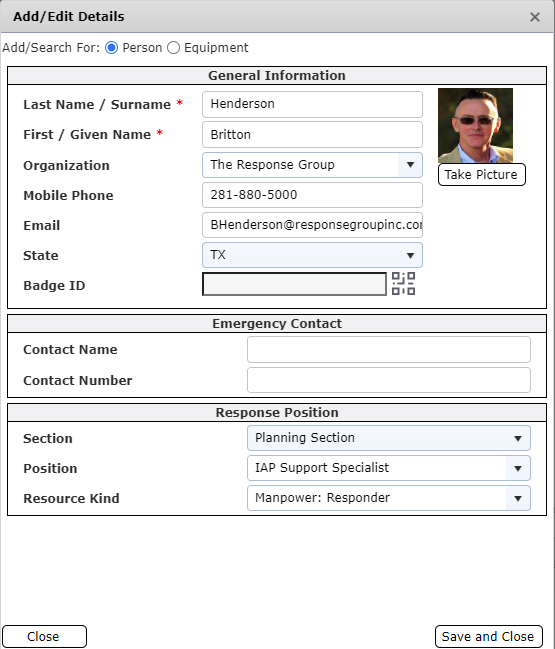
Personnel checking in to an incident for the first time typically will not have a badge. For identification and tracking purposes a badge can be created for everyone involved in response activities.
Before adding new personnel to a database, it is recommended to perform a quick search and verify the person has not already been created within the database.
Click the Create Badge button  located at the top left of the form. The Create Badge window will open. Ensure the toggle button
  is set on “Person”.
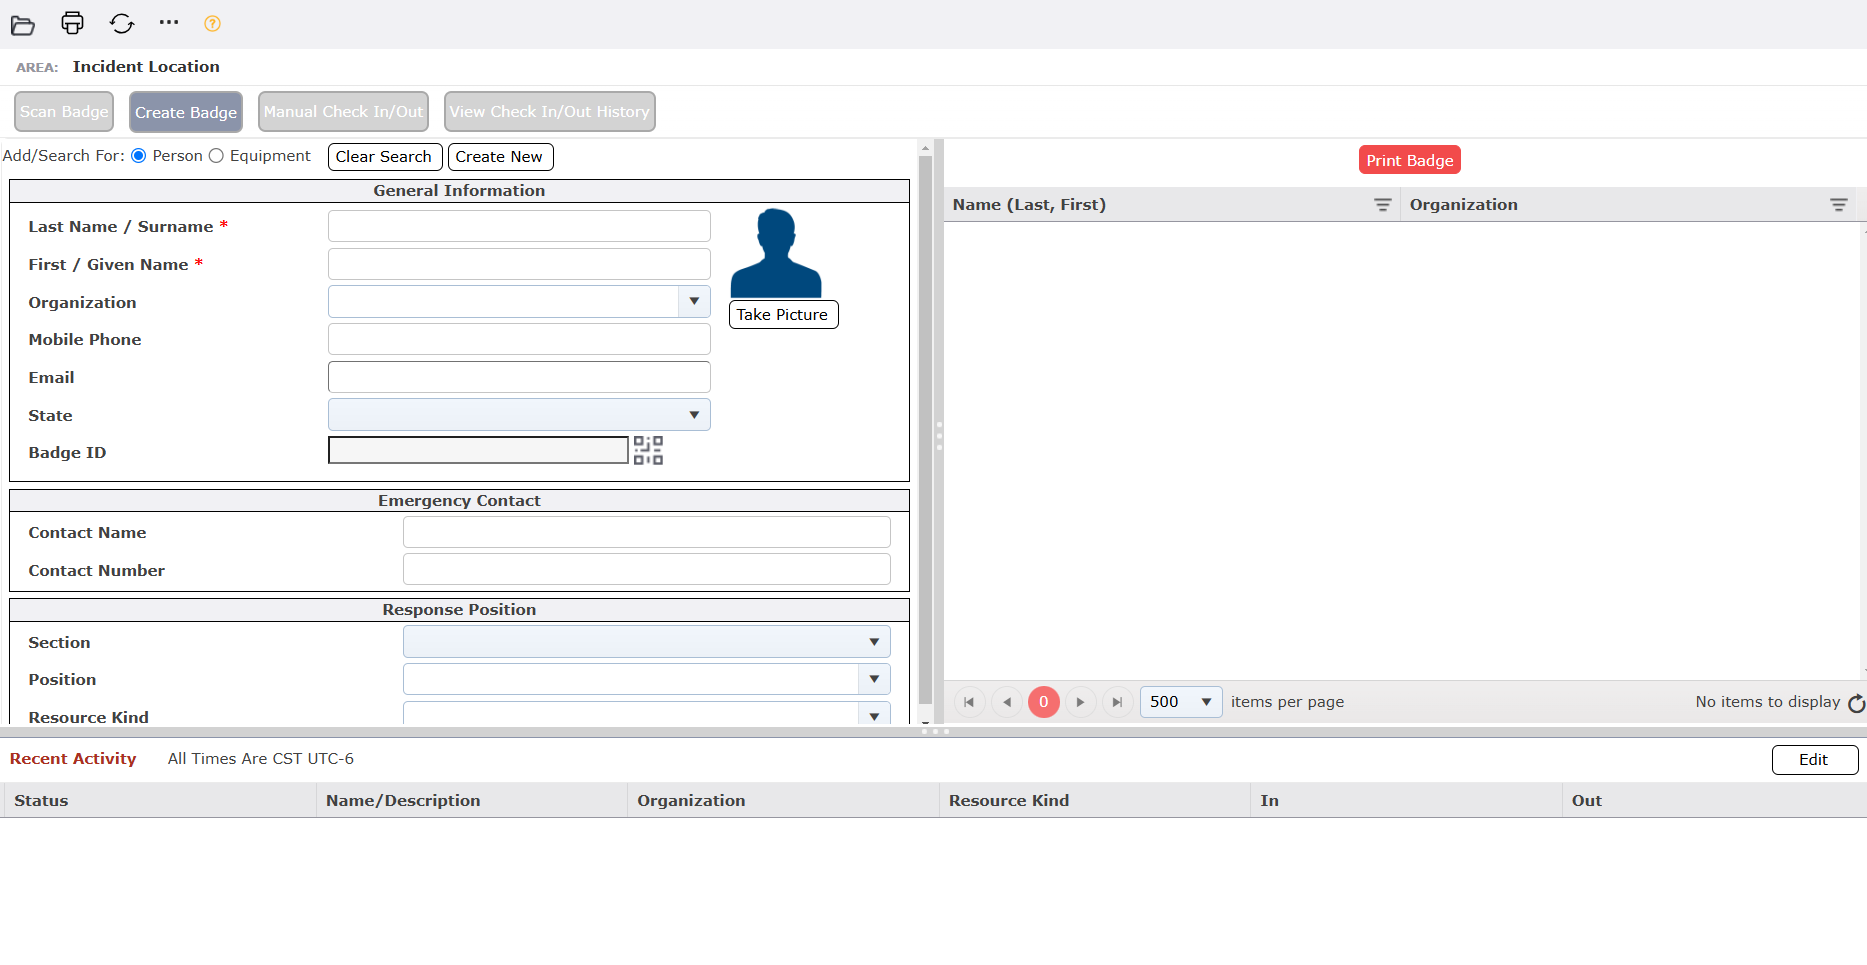
To search for a person, type at least the first three letters of their last name and then press the “tab” or “enter” key on your keyboard. The grid to the right will populate with the search results.
If the person already exists in the database, their profile can be updated by selecting the record from the right side of the page and then free type and use the dropdown lists to populate personnel details on the left side of the page.
Select the Save button  to capture the updates. Select the Print Badge button
  to generate the personnel badge. For more information see the Print a Personnel Badge section below.
If the name is not found with the search, the user can add the person using the Create New button  . For more information see the Add New Personnel section below.
If the name is not found with the search the user can add the personnel by free type and use the available dropdown lists to enter personnel profile details. NOTE: Fields with an asterisk (*) are required fields.
Add a photo of the person to the record.
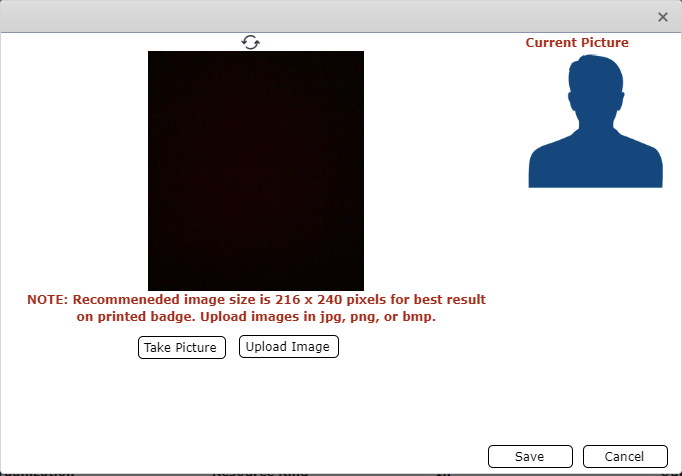
Taking a picture is the first of two options to include a person’s face on a badge. Choose from the available camera options. Ensure the person’s face is completely inside the square viewfinder. Then click the Take Picture button  .
.
NOTE: If the view screen remains black, it may be necessary to click the Refresh button  .
.
Users can also upload a pre-existing photo. Click the Upload Image button  . An Open dialog box to the local or network drive will appear. Navigate to the desired Image to upload.
NOTE: The image must be saved on the local hard drive or network drive. The compatible image file format extensions to upload are .bmp, .gif, .jpeg, .jpg, and .png.
Select the Save button to save the picture or click the Cancel Button
  to return to the Create Badge page.
Select the Create New button  to save the updates and add the person to the database and incident or Save and Check-in button
  to save the updates and check-in the person to the incident.
Click the Print Badge button  and follow the steps listed below to print a new badge.
From the Create Badge window a new badge can be printed by selecting the personnel name and clicking the Print Badge button  .
.
Use the drop-down options on the right-hand side of the Print Badge window to prepare the badge to be printed. A preview of the badge will be displayed below the options.
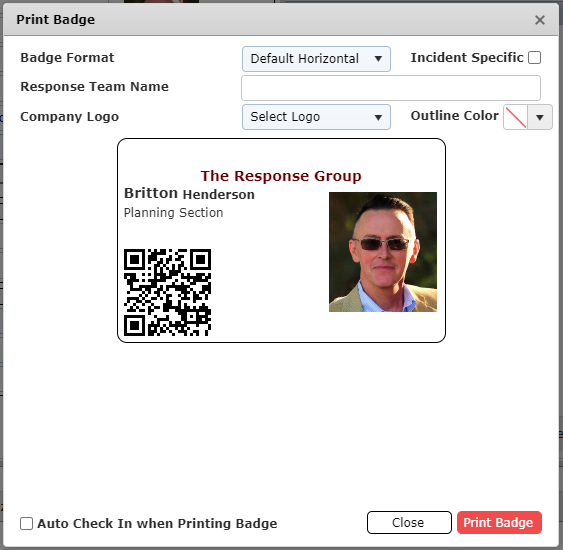
The Badge Format drop-down list is used to select from the different badge layout options. The layout arranges the person’s name, organization, ICS section and position, incident/event name, image, and QR Code in different layout combinations, and font sizes in either a horizontal or vertical orientation.
The Incident-Specific check box designates if the badge printed will be specific to the current incident or be a universal badge for any incident within the database.
The Response Team Name field is free-type or updates based on the Application Options page.
If a Company Logo is available, it can be selected from the drop-down menu and is managed within the Preloaded Images screen.
The Outline Color palette controls the color outline of the image.
Below the Badge Preview is an additional checkbox option as well as browser-specific badge printing instructions.
Use the Auto Check-in when Printing Badge checkbox  to allow personnel to be checked in by the software as the badge is printed.
NOTE: If the Save and Check In option was used when creating the personnel record checking the Auto Check-in when Printing Badge checkbox will check the person out when the badge is printed.
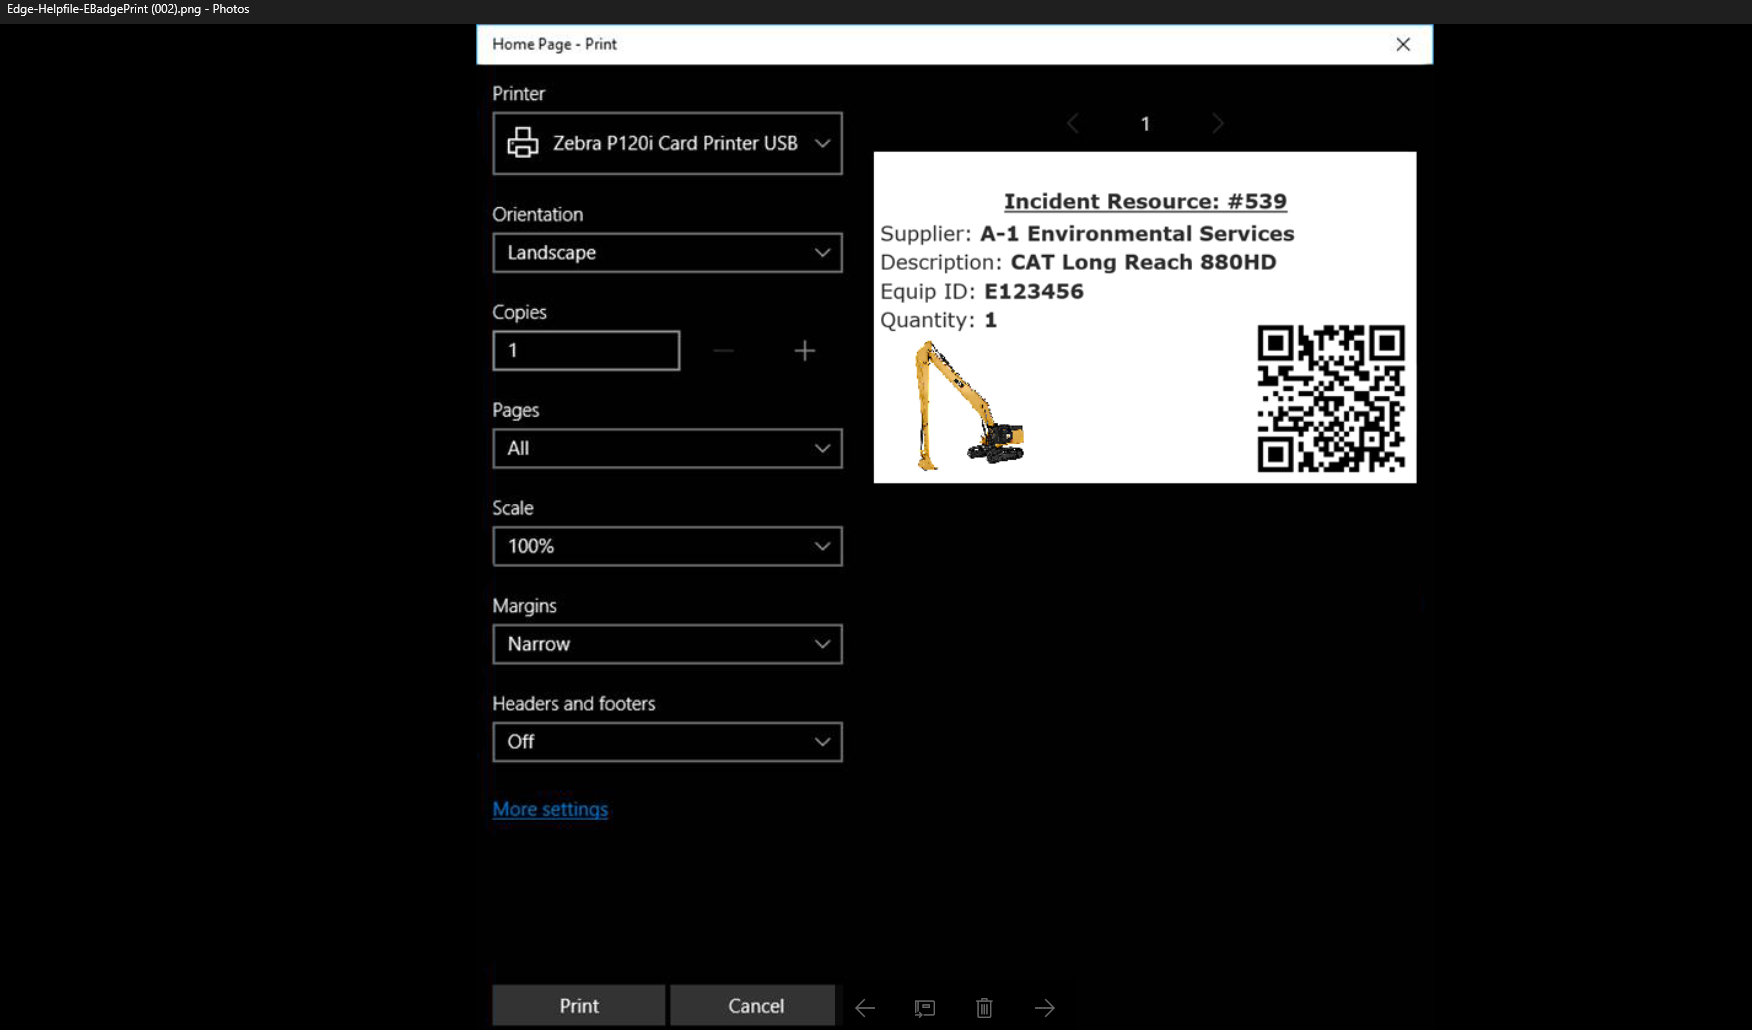
At the bottom of the print badge window are links to the most commonly used browsers, if you are experiencing issues with printing, select a browser option for browser-specific badge printing instructions.
Ensure the badge printer is installed correctly. In the Printers (or Devices) settings, set it as the default.
Press the Print Badge button  . The dimensions of a badge are 2.12” (54mm) x 3.38” (86 mm).
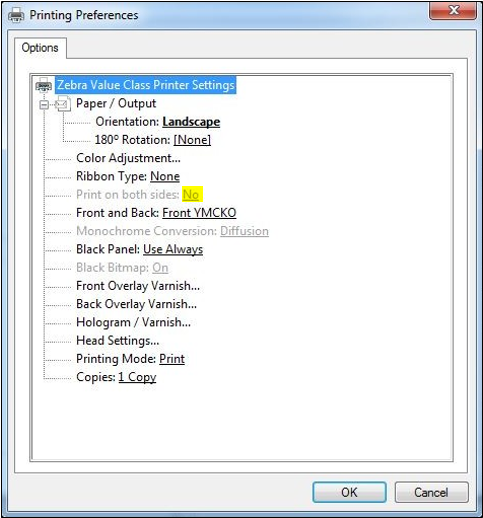
NOTE: The following badge printing configuration is the Microsoft Edge browser settings. IAP Software is commonly used with the Zebra card printer model P120i.
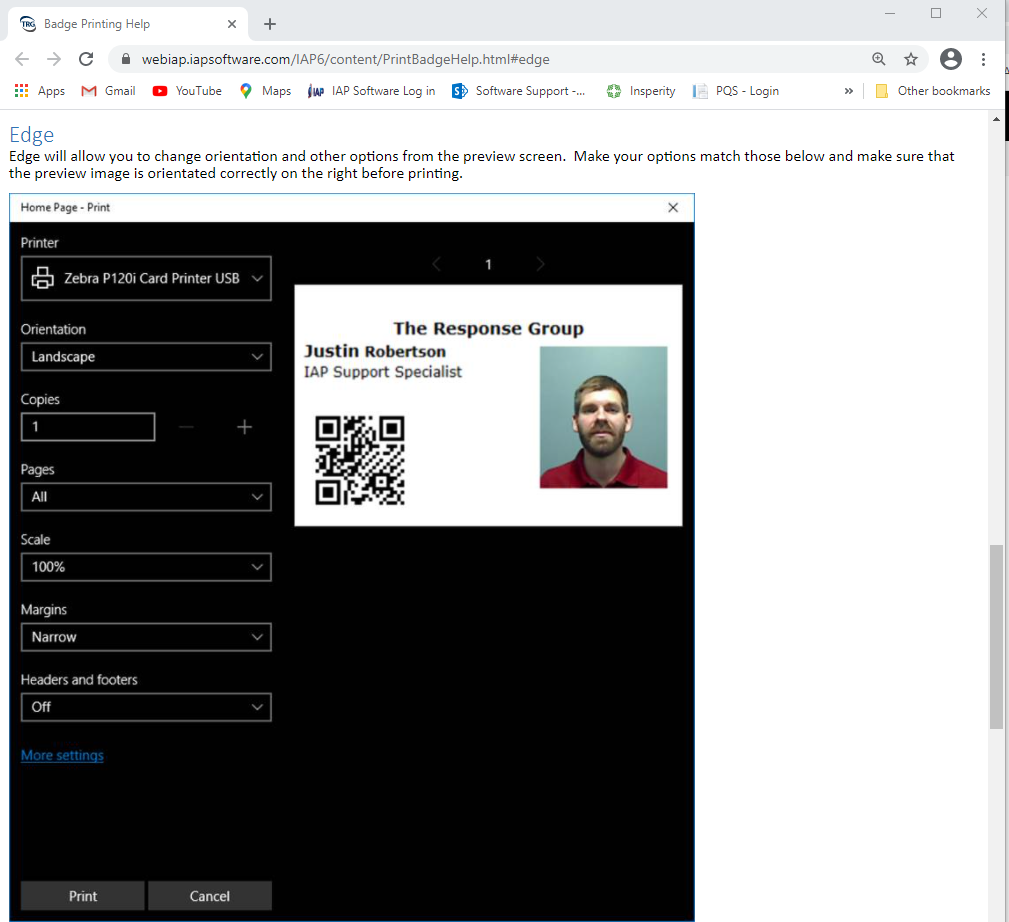
The Print dialog box will appear. Select the desired printer, then click the More Settings link at the bottom of the dialog box and ensure that it prints one-sided. Adjust the settings, as shown below. Click OK.
Click the Print button  to send the job to the printer.
For identification and tracking purposes, a badge can be created for each individual piece of equipment involved in response activities.
Before adding new equipment to a database, it is recommended to perform a quick search and verify the equipment has not already been created within the database.
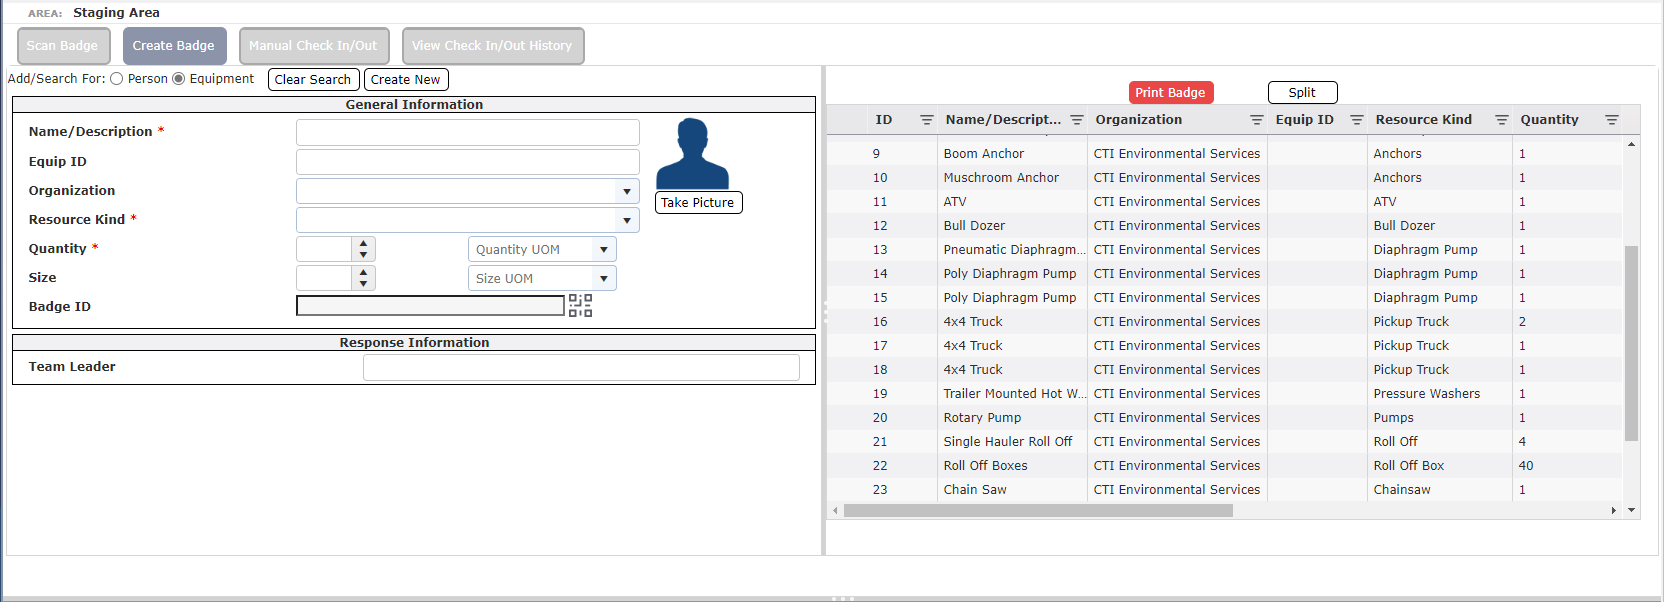
To search for equipment, toggle to the Equipment  button and enter as much information as possible to narrow the search field. Information such as the equipment’s Name/Description, Equip ID, Organization and Resource Kind. All equipment fields do not have to have information entered to search. The grid on the right side of the page will populate the search results.
If the equipment is already listed in the database, it’s attributes can be updated by selecting the record from the grid on the right side of the page and modifying its details on the left side of the page. Free type and use the drop-down lists to populate equipment details.
Press the Save button  to capture the updates or Save and Check-in button
  to save the updates and check-in the equipment to the incident.
Press the Print Badge button to generate the equipment badge. For more information see the Print an Equipment Badge section below.
If the equipment is not found with the search, the user can add it using the Create New button  . For more information see the Add New Equipment section below.
Press the Split button  to split the quantity that has arrived in the selected Area. For more information see the Split Resource section below
If the equipment is not found with the search the user can add it using the Create New button  . This allows a new piece of equipment to be checked into to the response by adding it to the database. Free type and use the available drop-down list to enter equipment details. Complete all necessary fields.
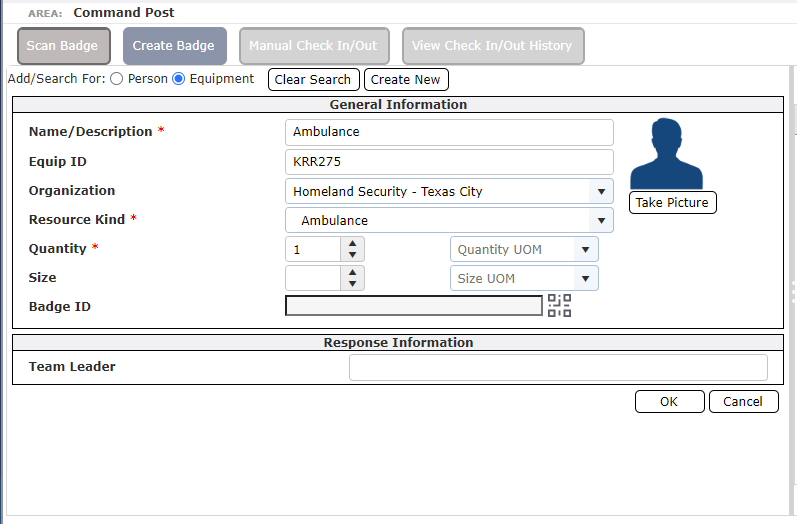
NOTE: Fields with an asterisk (*) are required fields.
After all equipment details have been entered click on the Create New button and the software will save it to the database and populate in the grid on the right side of the page.
Click the Take Picture button  to add a new photo of the equipment.
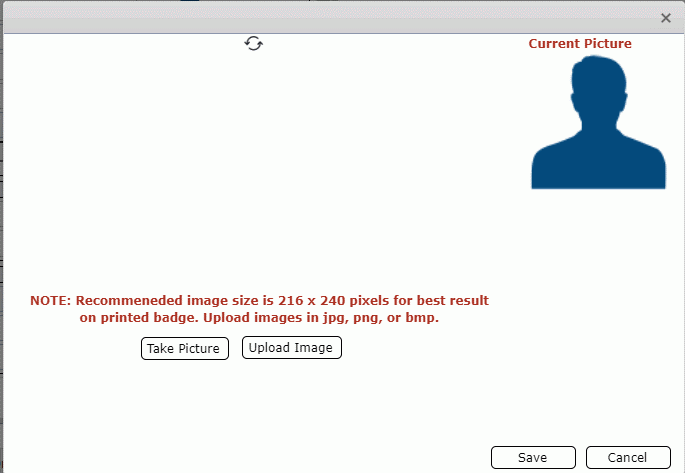
Taking a picture is the first of two options to include a photo of the equipment on a badge. Choose from the available camera options. Ensure the equipment is inside the square viewfinder completely. Then click the Take Picture button.
NOTE: If the view screen remains black, it may be necessary to click the Refresh button  .
.
Use the Upload Image button to upload a pre-existing photo. Click the Upload Image button  . An Open dialog box to the local or network drive will appear. Navigate to the desired Image to upload.
NOTE: The image must be saved on the local hard drive or network drive. The compatible image file format extensions to upload are .bmp, .gif, .jpeg, .jpg, and .png.
Select the Save button to save the picture or click the Cancel Button
  to return to the Create Badge page.
Select the Save button to save the updates and add the equipment to the database and incident or Save and Check-in button
  to save the updates and check-in the equipment to the incident. This will also add the equipment to the Resources Summary form.
Click the Print Badge button  and follow the steps listed below to print a new badge.
NOTE: Creating a badge for equipment not found in a search (as outlined in Manual Check In/Out of Equipment) will add the equipment, bypassing the ICS 213 RR – Resource Requisition and Procurement process but still auto-generate a 213RR for any manually added resources. For more information on formally requesting resources see the ICS 213RR page.
This option may be used on any resource with a quantity above one. Select the item and click the Split button  .
.
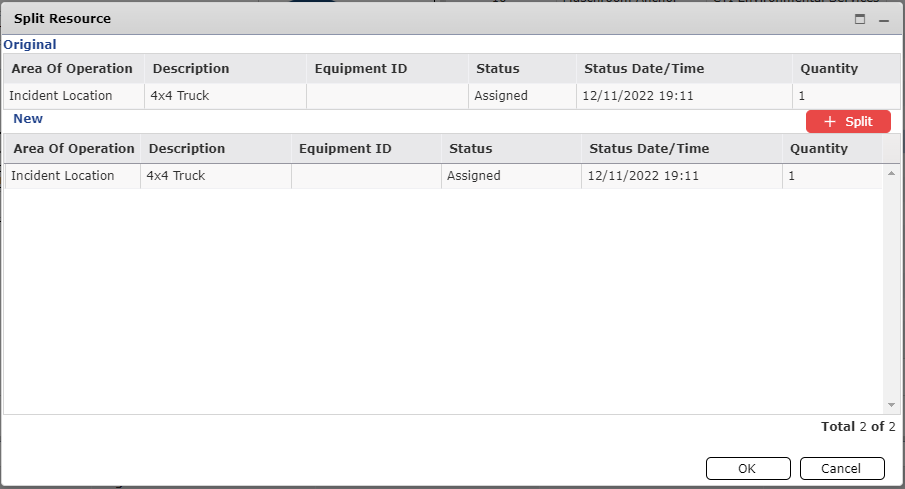
The system will automatically split the quantity in half to a New resource item. Adjust the quantity as needed, as well as any other information and click the OK button to complete the split action. You can also split the Original entry again but clicking the Split button  .
.
From the Create Badge window a new badge can be printed by selecting the equipment name and clicking the Print Badge button . Use the options on the right-hand side of the Print Badge window to prepare the badge to be printed. A preview of the badge will be displayed below the options.

The Badge Format dropdown can be used to select one of the following layout options.
The Basic layout includes Incident Resource #, Description, Equipment ID and QR code.
The Detailed format also includes the Supplier and the Quantity.
The QR Code Only layout will print a badge with only a QR code.
Below the Badge Preview is an additional checkbox option.
Use the Auto Check-in when Printing Badge checkbox  to allow equipment to be checked in by the software as the badge is printed.
NOTE: If the Save and Check In option was used when creating the equipment record checking the Auto Check-in when Printing Badge checkbox will check the resource out when the badge is printed.
Ensure the badge printer is installed. In the Printers (or Devices) settings, set it as the default.
Press the Print Badge button  . The dimensions of a badge are 2.12” (54mm) x 3.38” (86 mm).
The Print dialog box will appear. Select the desired printer then click the More Settings link at the bottom of the dialog box and ensure that it prints one-sided.
NOTE: The following badge printing configuration is the Microsoft Edge browser settings. IAP Software is commonly used with the Zebra card printer model P120i.
The Print dialog box will appear. Select the desired printer, then click the More Settings link at the bottom of the dialog box and ensure that it prints one-sided. Adjust the settings, as shown below. Click OK.

Click the Print button  to send the job to the printer.
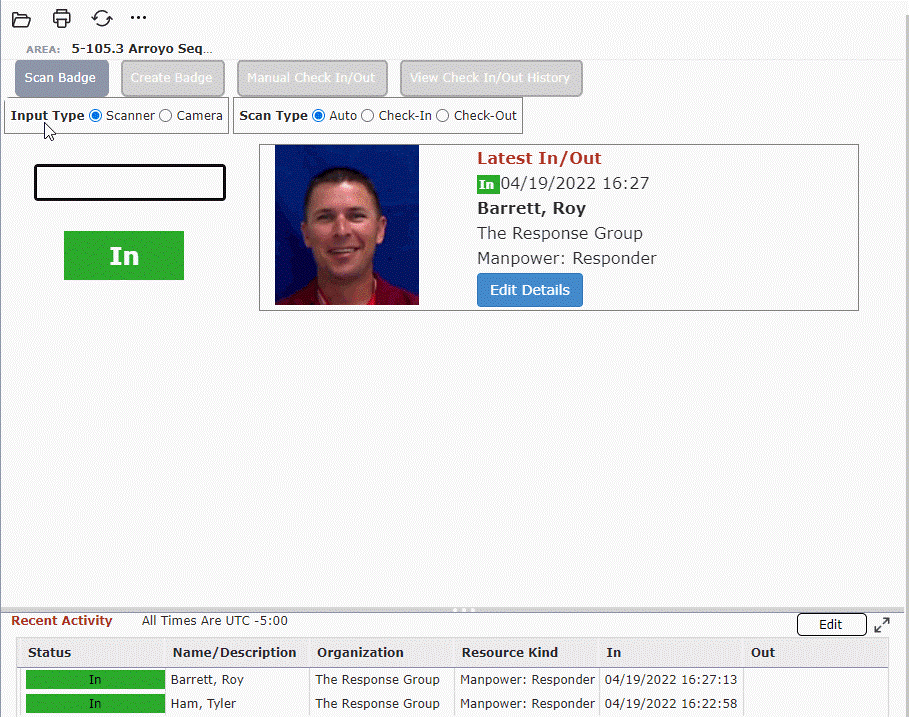
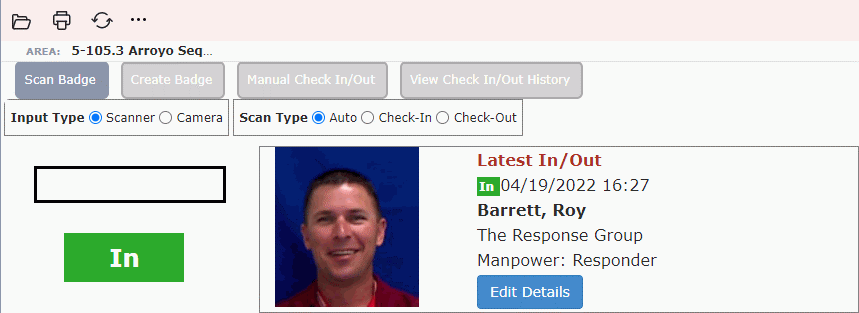
Click the Scan Badge button . The Scan Badge dialog box will open and is ready to check personnel and equipment in or out of the current Area of Operation. The Badge Scanning dialog box contains two sections:
The top section is for scanning and status and contains the Latest In/Out details.
The bottom section contains recent activity and allows users to view/edit in or out times of previous scans.
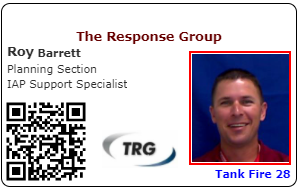
Scanning a badge requires a Quick Response (QR) Code or a barcode. Below is an example badge with a QR Code in the bottom-left corner.
To scan a badge with a camera, such as the integrated webcam (i.e., front-facing camera) or a USB webcam, select the Camera radio button. 
To scan a badge with an external scanning device, select the Scanner radio button. 
Choosing the Scan Type determines if personnel and equipment are entering or departing the Area of Operation.
Choose Auto  to check in and out. By default, if the person or equipment is scanned (or entered manually) into the Area of Operation for the first time, it will receive the status of In. The next scan (or manual input) will receive a status of Out. The status will alternate between In and Out each time.
Choose Check-In  to ensure all scans (or manual input) receive a status of In.
Choose Check-Out  to ensure all scans (or manual input) receive a status of Out.
After a badge has been scanned the Latest Scan details will appear on the right-hand side of the scanning window. Click the Edit Details button  to edit basic personnel details.
After edits are made, click the Save and Close  to update any changes.
NOTE: A full list of available personnel details can be updated in Personnel. For more information on updating complete personnel details see the Personnel page.
In the event a scanning device or webcam is inoperable or unavailable, personnel and equipment can be checked in and out manually. To use the manual entry feature, click the Manual Check In/Out button. 
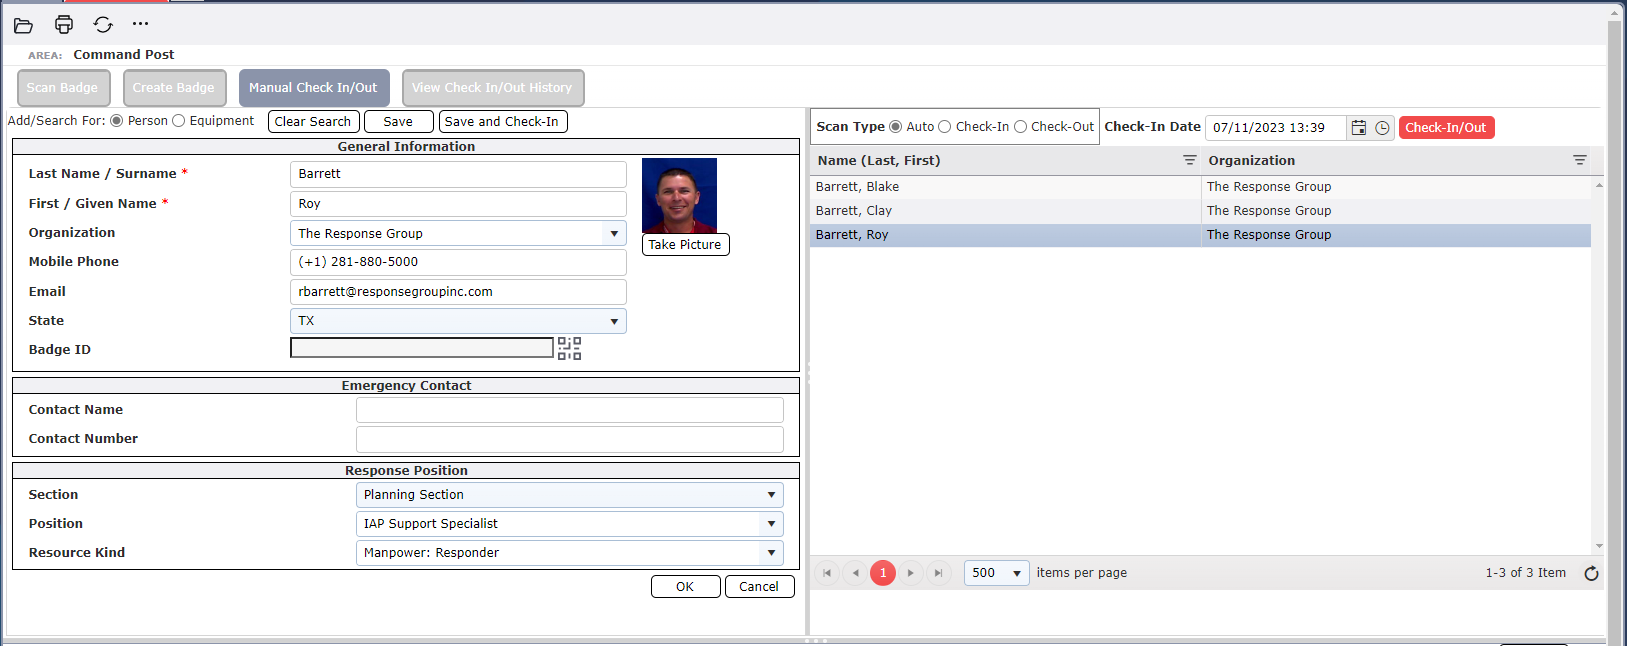
Within the Manual Check In/Out window, ensure the toggle is set to “Person”  and use the provided fields to search personnel, type in their last name then press the tab or enter key on your keyboard, the grid to the right will populate with the search results.
If the searched personnel name appears, select to highlight, and click the Check-In/Out button  . The check in/out status will be displayed at the bottom of the page in the Recent Activity section of the Manual Check In/Out window and will be added to the Check In/Out form.

If the personnel searched for is not already existing in the database, use the Create New button  to add them. For more detailed steps on adding new personnel see the Add New Personnel section above.
Within the Manual Check In/Out window, ensure the toggle is set to “Equipment”.  and use the provided fields to conduct an equipment search by entering as much information as possible to narrow the search field. Information such as equipment’s Name/Description, Equip ID, Organization, and Resource Kind. All equipment fields do not have to have information entered to search, the grid to the right will populate with the search results.
If the searched equipment appears, select to highlight, and click the Check-In/Out button  . The check in/out status will be displayed at the bottom of the page in the Recent Activity section of the Manual Check In/Out window and will be added to the Check In/Out form.

If the equipment searched for does not already exist in the database, use the “Create New” button  to add it. For more detailed steps on adding new equipment see the Add New Equipment section above.
It may become necessary to make changes to details after scanning personnel and equipment. The Edit and Bulk Edit buttons give users the ability to make such changes.
Within the Check In/Out or the View Check In/Out History screens, to edit the check in/out date and time of personnel or equipment, highlight a line item in the Recent Activity section of the page and click the “Edit” button  . The “Edit Check In” dialog box will appear.
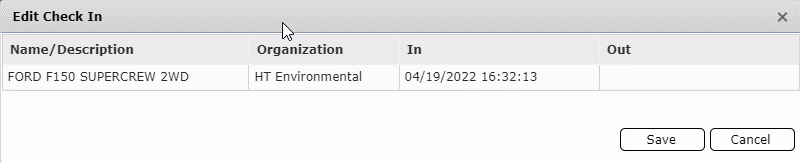
Adjust the In or Out date/time. Click in the field and the Calendar Control button  appears; select it to adjust the date and time. For more information see the Calendar Control page.
After all edits have been completed click Save. This will close the Edit Check In dialog box and return to the Check In/Out screen.
The Bulk Edit button  allows users to edit check in/out data for all personnel and equipment records displayed at one time, instead of changing each item individually. Clicking the button will activate the Bulk Edit dialog box. To access this feature within the Check In/Out screen, users must be under the View Check In/Out History tab. Users must first filter the grid to show only records to be updated then select whether to Bulk Checkout, Bulk Delete, Change Check-In Area or Update Resource Summary, using the Select Action drop-down.

NOTE: The Bulk Edit feature must be enabled in the user’s Role Permissions to be available for use. For more information see the Role Permissions page.
NOTE: Make sure that you filter before doing any type of bulk edit.
The Bulk Checkout option allows a user to check out all personnel and equipment records displayed for the selected Area of Operation.
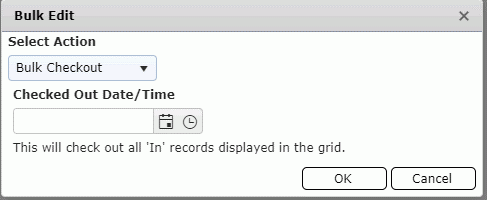
Filter the list of Check In information to show only the records to be updated. This can be done using the Show Past dropdown  or the filter options on the columns in the Check In/Out screen.
Select the Bulk Checkout option from the dropdown list.
Then select the checkout date and time to be assigned by using the Calendar Control  or free typing.
Click OK button. All records will be checked out from the Area of Operation.
The Bulk Delete option allows a user to delete all personnel and equipment records displayed from the Area of Operation.
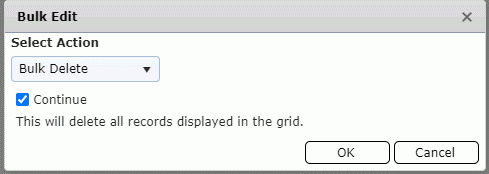
Filter the list of Check In information to show only the records to be updated. This can be done using the Show Past drop-down or the filter options on the columns in the Check In/Out screen.
Select the Bulk Delete option from the Select Action drop-down.
Then click the check box next to Continue. The OK button will be activated. Click OK.
The “Confirm Delete” dialog box will appear. Click OK to continue.
All records will be deleted from the Area of Operation.
NOTE: Be sure this is the desired action because there is not an undo option for this action.
Selecting the Change Check-In Area option allows a user to move check-in information between Areas of Operation.
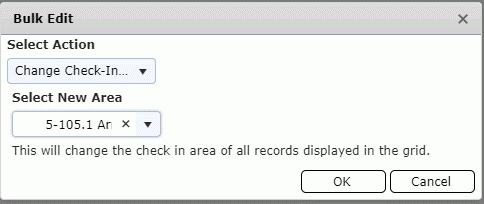
Filter the list of Check In information to show only the records to be updated. This can be done using the Show Past drop-down or the filter options on the columns in the Check In/Out screen.
Select the Change Check-In Area option from the Select Action drop-down.
Then select the new Area for the selected entries using the Select New Area drop-down.
Click OK. All records will be moved to the newly selected Area of Operation.
Selecting the Update Resource Summary option allows a user to update either the Resource Area, Resource Status, or both for all resource records displayed.
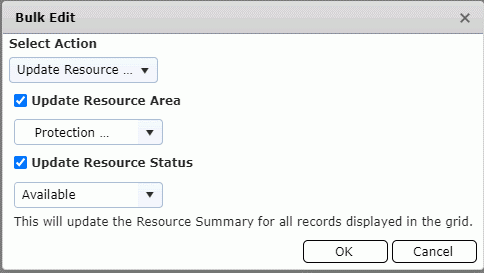
Filter the list of Check In information to show only the records to be updated. This can be done using the Show Past drop-down or the filter options on the columns in the Check In/Out screen.
Select the Update Resource Summary option from the Select Action drop-down.
Use the check boxes and dropdown lists to select how to update the resource summary then click OK.
The Update Resource Area check box  and drop-down will change the Area of Operation.
The Update Resource Status check box  and drop-down will change the Resource Status.
The Confirm Resource Summary Change dialog box will appear. Click OK to continue. All records will be updated.
© 2024, TRG The Response Group LLC., All rights are reserved.
No part of this web site, and the information which it contains, may be reproduced, stored in a retrieval system or transmitted in any form or by any means, electronic, mechanical, photocopying, recording or otherwise, without prior written permission of TRG.