| IAP Software ™ |  |
| IAP Software ™ | |
ICS 213RR – Resource Request
The ICS 213RR Resource Request is used by all sections to request, review and approve, and procure resources during an incident. The 213RR dashboard displays the list of all requisitions which have been created. Users can create requisitions (will open in a new tab), copy them, and assign them to a specific user for editing. Users can also activate a pre-plan from this interface, which will create requisitions for resources in the activated plan. In this section, users will learn how to create, approve, and review requisitions.
Contents
Create an ICS 213 Resource Request
Subscribe/Unsubscribe to a Requisition
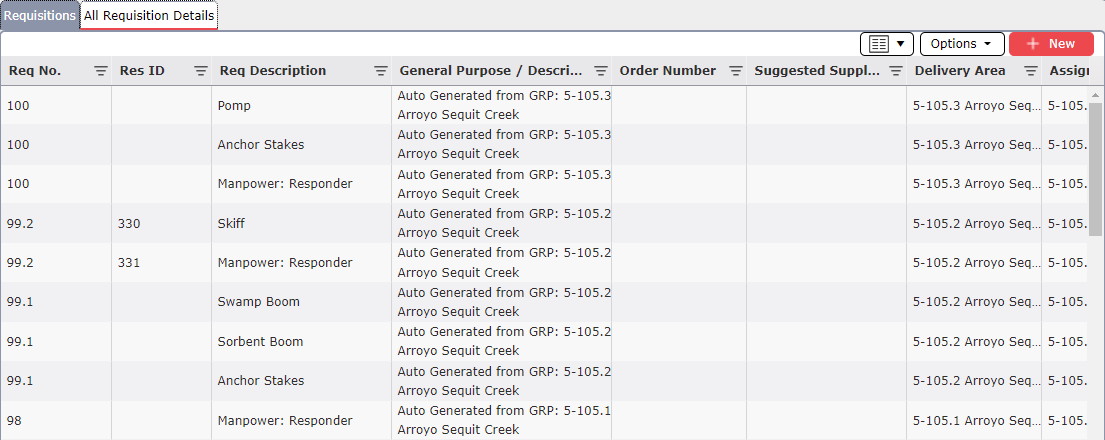
The Requisition Dashboard window shows the resource requests for the incident sorted by their current status. Users are taken to this overview screen after selecting the ICS 213-RR Resource Request from the navigation menu.
This board shows how many requests are currently in each of the following status: Draft, Resource Review, Ready to Order and Closed.

NOTE: 213 RRs with a  to the left are urgent requests.
Users can click on each of the symbols below to access all requests within that status.
To list requests on draft 
To list requests finished by requestor but awaiting approval from their leadership 
To list requests waiting for Resource Unit review 
To list requests being reviewed and ordered by Logistics Section 
To list requests being reviewed by Finance Section 
To list all completed and closed requests 
At the top of the Requisitions tab users can click the Auto Refresh checkbox  to continuously refresh the grid at a set interval.
Click the Refresh button  to manually refresh the grid and view the latest list of requisitions for the incident.
User can search specific requests by using Search  and typing characteristics described on columns General Purpose/Description, Requested By and Checked Out/Assigned To to quickly find requests.
Click the Options button to view all available options for the selected resource request.
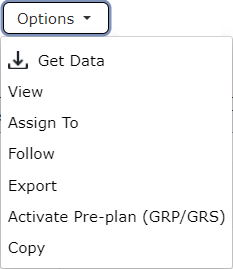
View button  to render a PDF version of the requisition in a new tab.
Click the Assign To button  to assign a requisition to a Logistics member for procurement.
Select a requisition then click the Follow button  to receive notifications when changes are made to the resource request.
Click the Export button  to export the data from the ICS 213-RR to your computer. The file will be created with an Excel extension (.xlsx).
The Requisition window shows all the current resource requests for the incident.
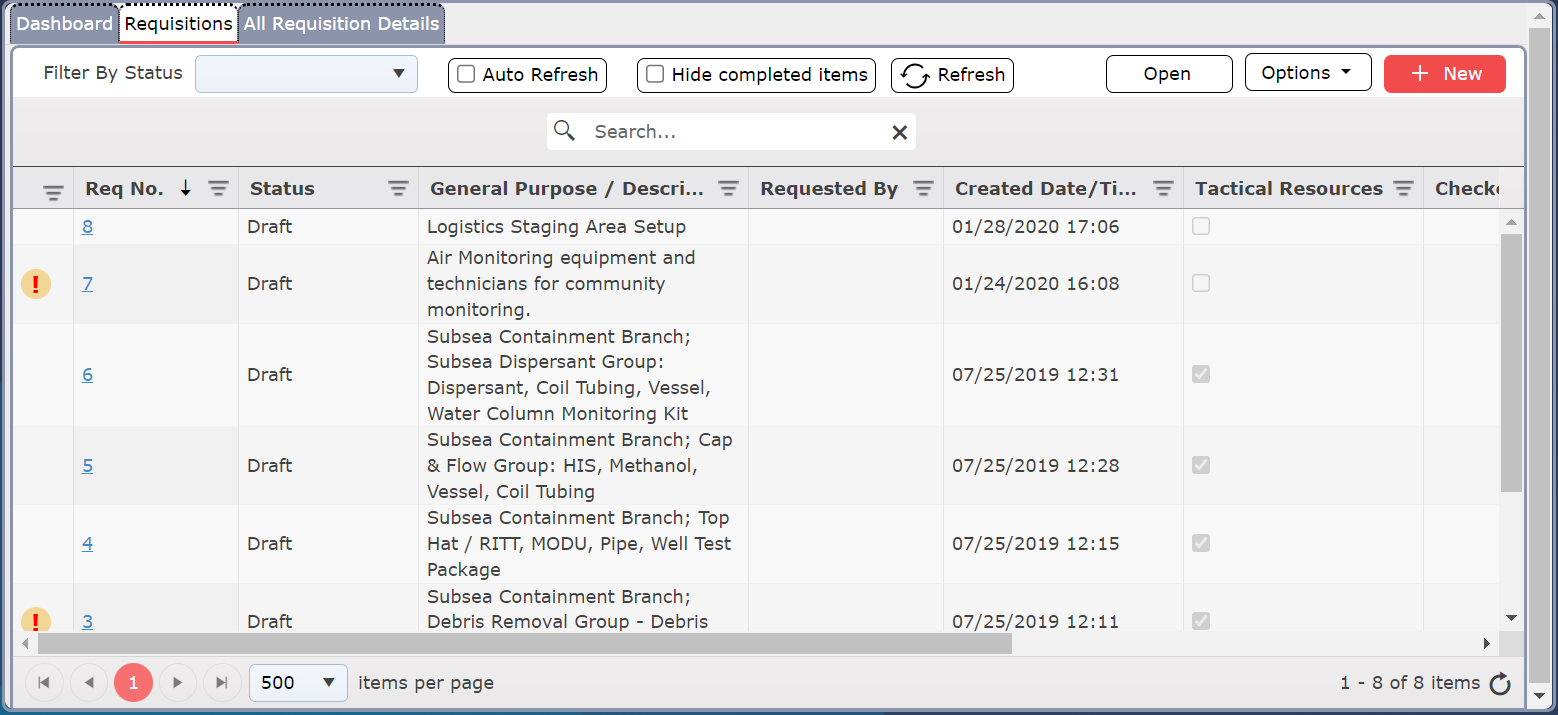
At the top of the Requisitions tab the Filter By Status drop-down  can be used to show only requisitions with a certain status within the grid.
The users have to option to Hide Completed Items clicking the  buttom. The windows will only show requests that still need actions and/or are currently ongoing.
A requisition provides the details about who, what, and where resources are needed during the incident. It should include as much descriptive information as possible to help streamline the procurement process.
There are several different ways to create a new requisition. Use the New button  or Options button on the overview screen to choose one of the following ways to create a new resource request.
Click the New button  to create a blank requisition in a new tab.
Select an existing requisition, then click the Copy button  to copy the details of a current requisition to create a new requisition. Select and open the new requisition to make updates.
Click the Get Data button  to create a requisition starting from a preloaded version. Select and open the new requisition to make updates.
Click the Activate Pre-plan (GRP/GRS) button  to create new Areas of Operation and resource requests associated to those areas based on geographically predetermined response actions. For more information, see the Activate GRP page.
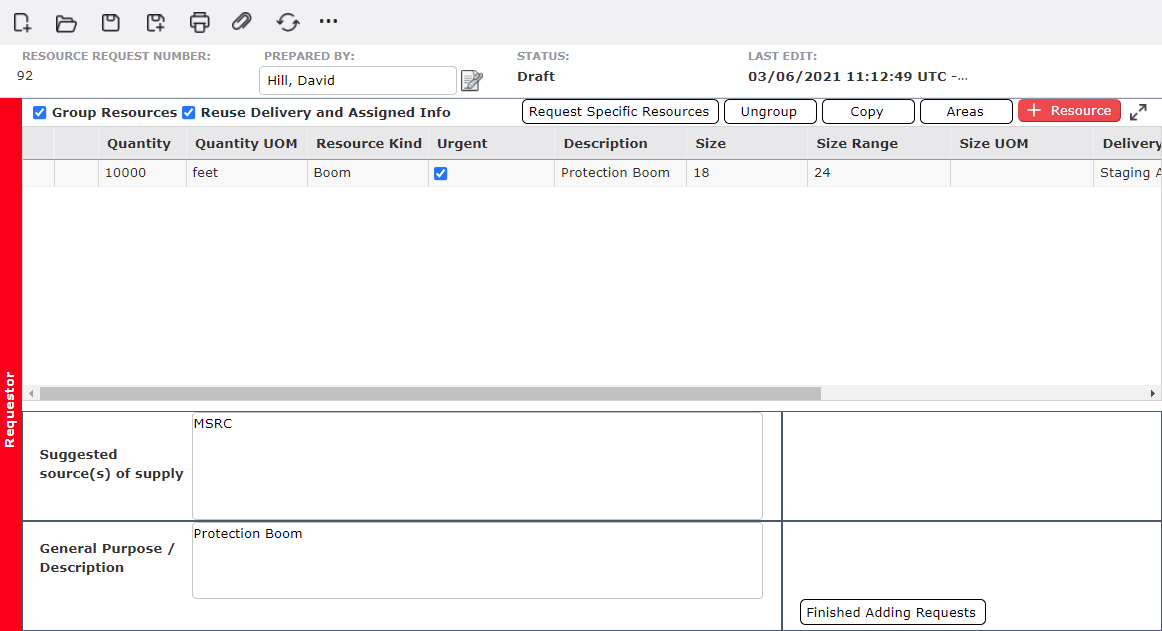
Upon creating/opening a new requisition the status will be Creating until moved to the next step in the process. To request resource(s), complete the Requestor section:
In the Prepared By field, enter the name of the requestor.
Use The Add button  to add a new blank resource line item to populate resource attributes.
Use the Request Specific Resources button  to search for available resources. The Find Resources window allows users to search for available resources in the area surrounding the incident or a designated location.
Enter the details of the requested resource item(s). The fields Quantity, Quantity UOM, Resource Kind, Description, Delivery Area, Delivery Date, and Assigned Area are required.
Select an existing resource then use the Copy button  to duplicate the resource on the request.
Use the provided options to facilitate completing the request information.
Use the Ungroup button  to remove parent/child resource relationships.
Use the Areas button  to review and add Areas of Operations to which resources are assigned.
Use the Group Resources checkbox  to show or hide parent/child resource relationships.
When the Reuse Delivery and Assigned Info checkbox  is selected the Delivery Area, Delivery Date and Assigned fields will auto-populate with the information entered for the top resource for any additional resources added to the request.
If known, enter the Suggested source(s) of supply.
Use the General Purpose/Description to enter a summary of the purpose and tasks the resources are requested to complete.
When the requisition is ready to be processed, click the Finished Adding Requests button  . The Apply Signature window will open. Use one of the signature options described in the Apply Signature section below to advance the request.
After resources have been requested the requisition form must go through a series of approvals. The approval process includes options to approve and sign, request changes to, or deny the request.
After reviewing the request, it may be determined that changes are needed before approval is granted. Requesting changes will return the request to Draft status and allow the original requestor to make the necessary updates.
If changes are needed, click the Request Changes button  . The Apply Signature window will open.
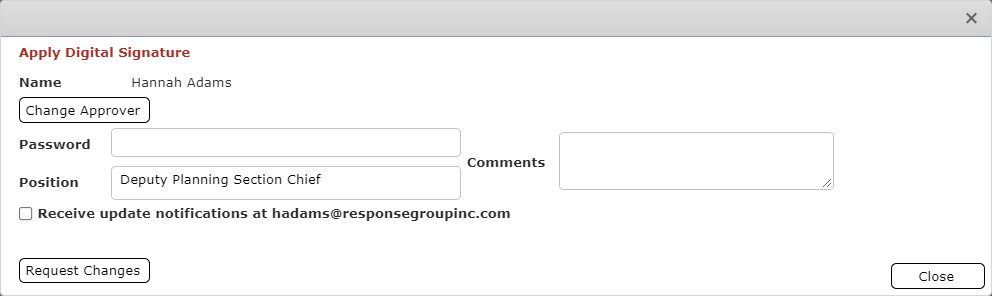
Within the Apply Signature window select from the available options, Password, Name, Position, and Comments explaining the changes needed and then click the Request Changes button  .
.
Click the checkbox to Receive update notifications  at the designated email address. Notifications will be distributed each time the requisition is updated or advanced with the approval process.
Confirm the Request by clicking Yes.
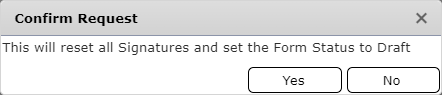
The signature will be applied, and the requisition status will be reset to Draft enabling the requestor to make the necessary changes.
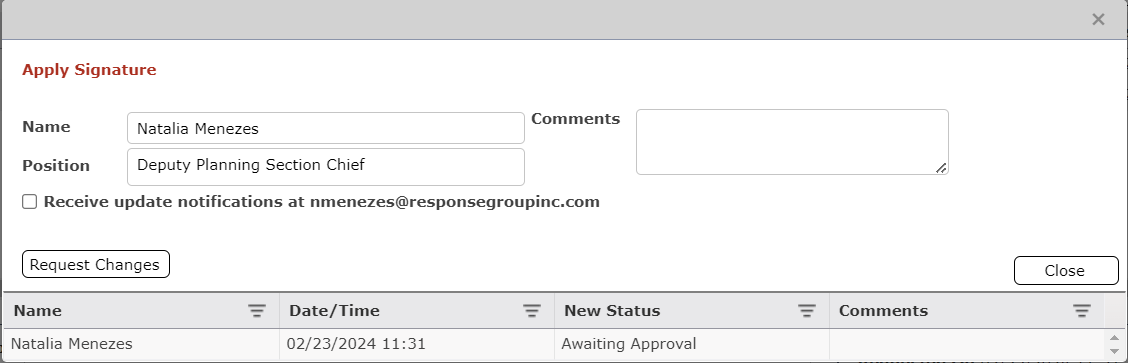
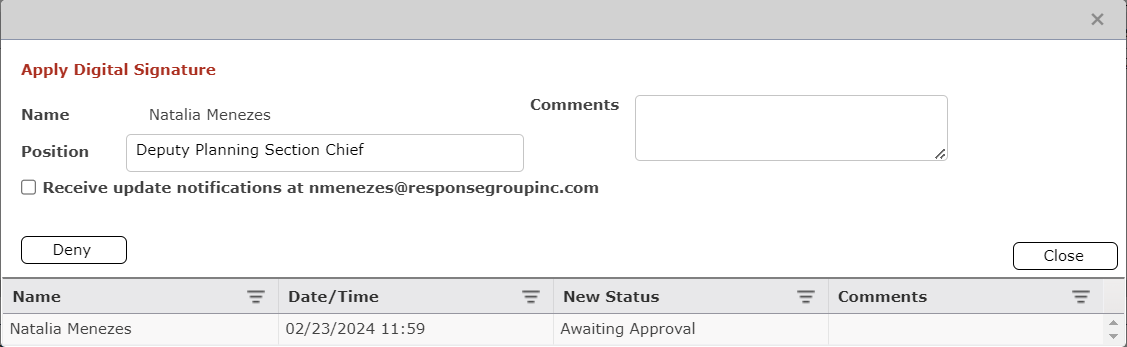
Review the request making any necessary updates then click the Approve  . The Apply Signature window will open.

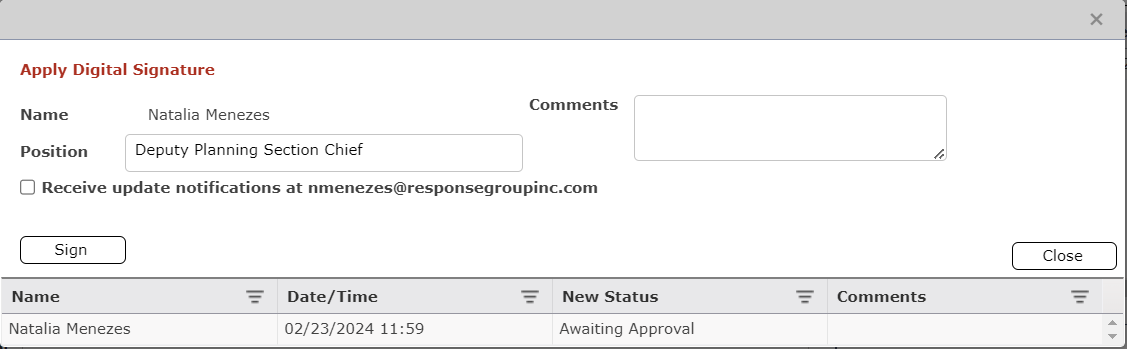
Within the Apply Signature window select from the available options, then click the Sign button  .
.
Click the checkbox to Receive update notifications  at the designated email address. Notifications will be distributed each time the requisition is updated or advanced with the approval process.
Free type to add any relevant comments.
The signature will be applied, and the requisition status will be updated to Awaiting RESL Review. The form will produce a Section Chief/Command Staff Approval and Approved Date stamp.
If the request will not be approved and will not be forwarded for fulfillment, click the Deny button  . The Apply Signature window will open.
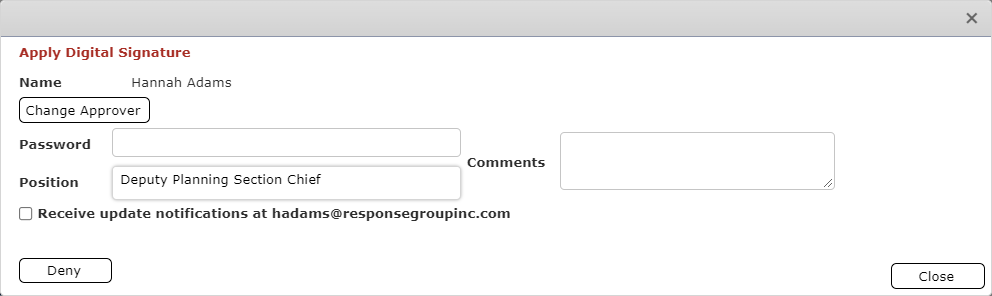
Within the Apply Signature window select from the available options, then click the Deny button  .
.
Click the checkbox to Receive update notifications  at the designated email address. Notifications will be distributed each time the requisition is updated or advanced with the approval process.
Free type to add a comment explaining the changes needed. A comment is required to deny a request.
Confirm the Request by clicking Yes.

The signature will be applied, and the requisition status will be set to Disapproved. Further approvals will be blocked.
Once the requisition has been created and approved the Resources Unit Leader (RESL) will review the request and availability of resources. From the Requisition tab on the overview screen select a requisition with status Awaiting RESL Review. Then click the Review button  within the Options menu to open the selected request.

Review the resources being requested to determine current availability.
If the request includes a tactical resource, check the Tactical checkbox  .
.
Use the availability checkboxes 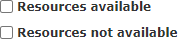 provided to indicate whether the resources are available.
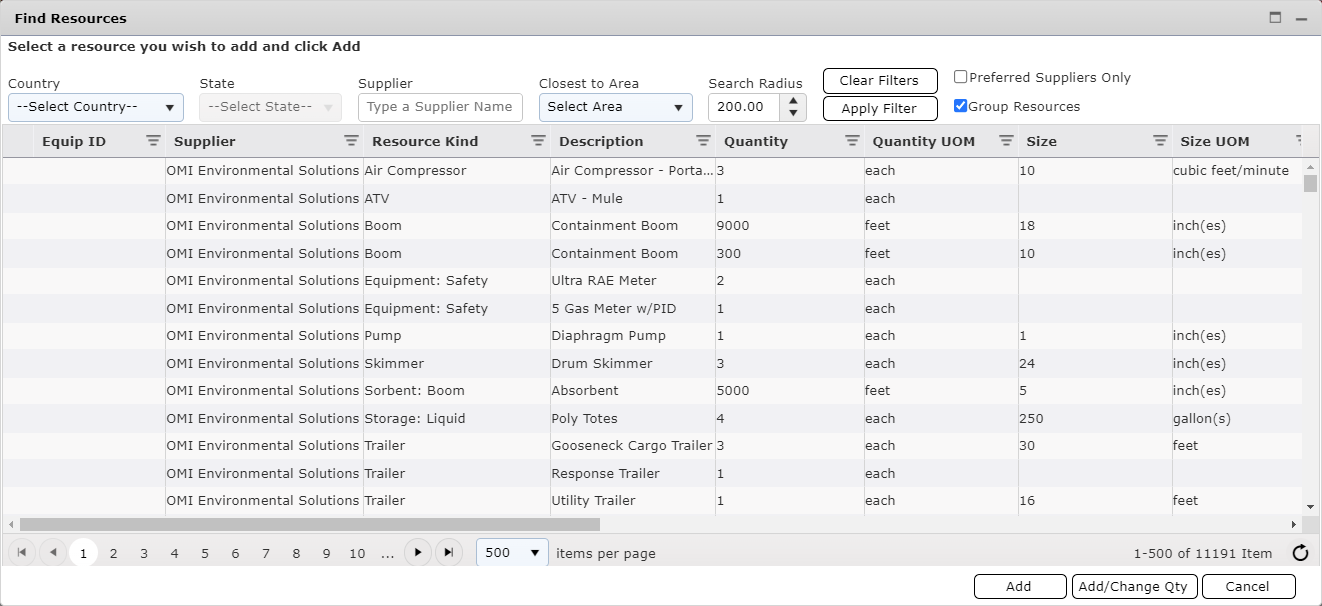
Resources available denotes that the requested resource(s) is/are available in response; see the Resources Summary for availability. If resources are available within the incident, as part of the review process, the RESL should complete the Procurement Details portion of the Requestor section using the Find Resources button  . See the Find Incident Resources section below for more information on finding incident resources.
Resources not available denotes that the resources must be procured by the Logistics Section.
NOTE: Requests that have multiple resources can have resources both available and not available.
After reviewing the request use one of the signature options described in the Apply Signature section above to advance or step back the request. The Complete Review  button is used to Advance the request to Logistics. Follow the steps described in the Apply Signature section to finalize and sign the request.
If resources are available within the incident, as part of the review process, the RESL should complete the Procurement Details section.
Click the Find Resources button  to display the Find Resources window. The default view for this window will display only resources at staging areas with the same Resource Kind. To show all incident resources un-check the box next to
  . To show only available incident resources un-check the box next to
  .
.
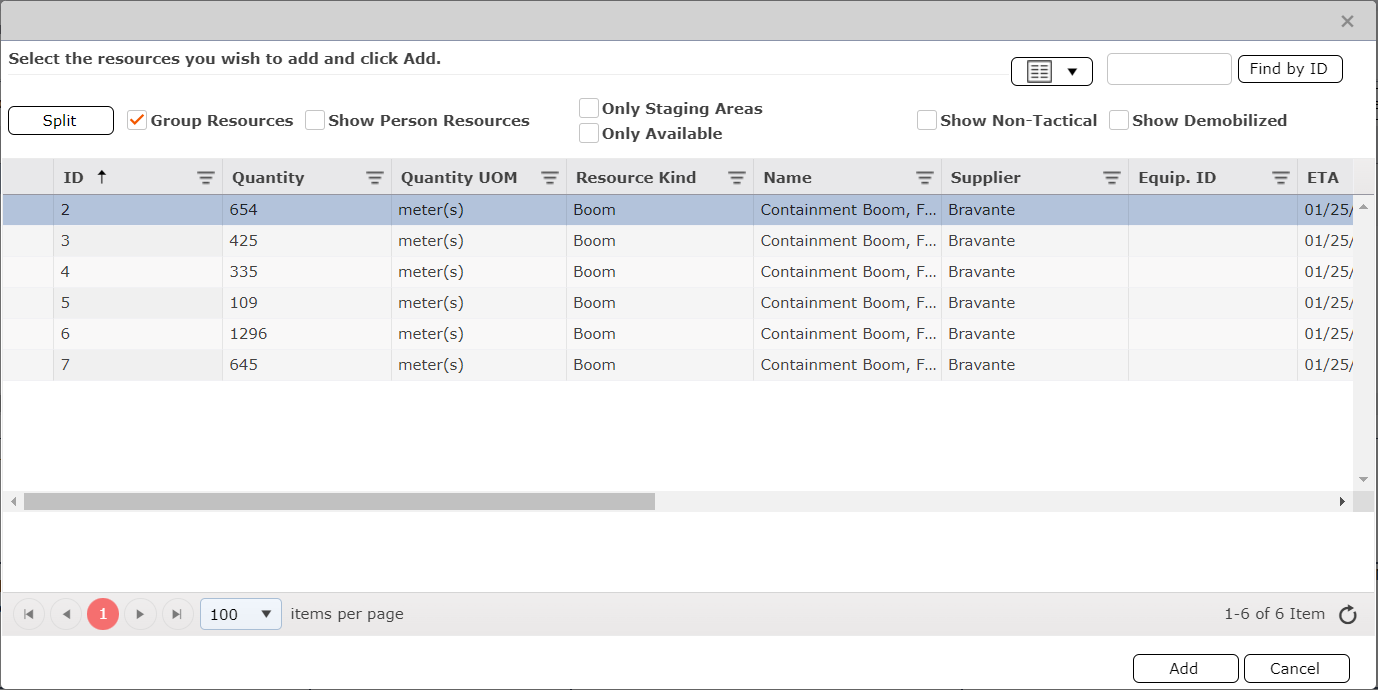
Select the resource from the list provided and click the Add button  . Repeat steps 1 and 2 for all available resources.
Once all resources have been added, use the Notes field to provide information to logistics around available resources.

Click the Complete Review button  to approve and advance the request to the next step of the requisition process. Follow the steps described in the Apply Signature section to finalize and sign the request.
The Procurement phase of a requisition documents when resources are ordered and where they are ordered from, as well as pricing information. From the Requisition tab select a requisition with status Ready for Ordering then click the Check Out button  to open the selected request.
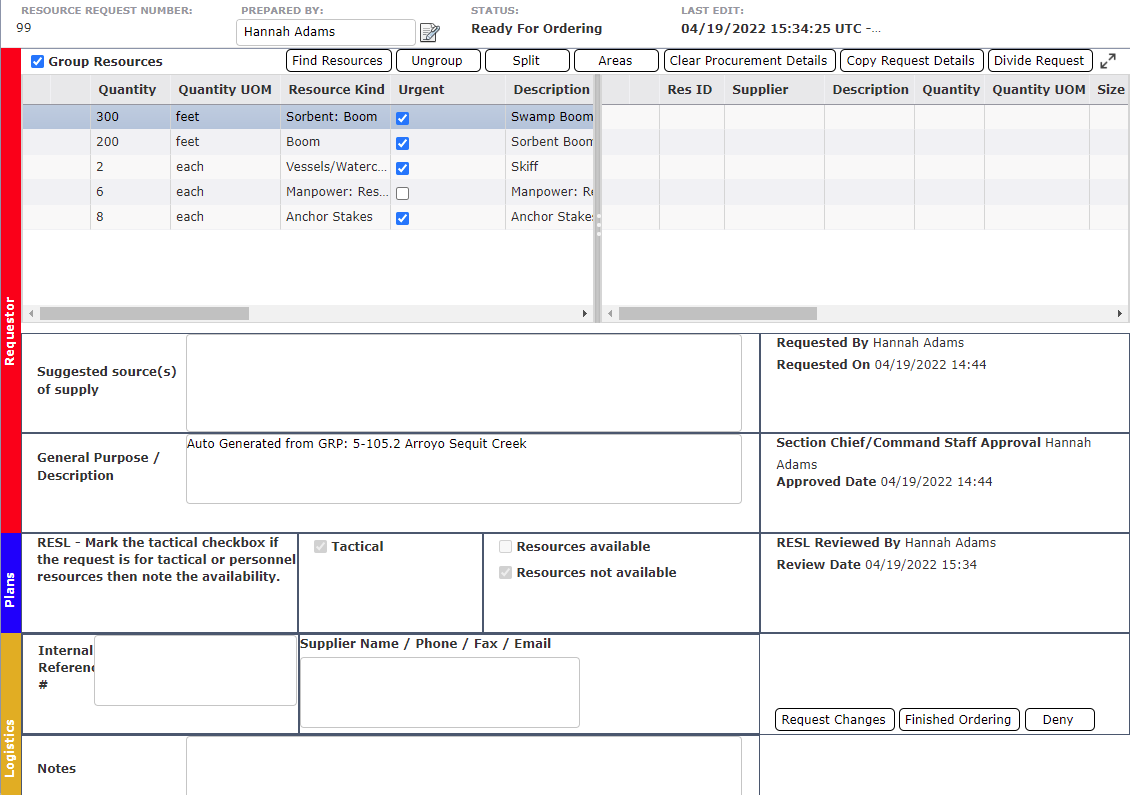
Enter the details of the resources procured on the top right-hand side of the form. The fields Supplier, Description, Quantity, and Quantity UOM are required. If available enter pricing information for each piece of equipment including Order Number if provided.

Users are provided with a selection of helpful buttons at the top of the form which aid in adding resources including Find Resources, Ungroup, Split, and Areas. For more information about using any of these buttons see the Create an ICS 213 Resource Request section above.
To copy request details of all resources from the Request side to the Procure side of the form, click the Copy Request Details button  . The details remain free to edit.
To clear procurement details of all requested resources on the Procure side of the form, click the Clear Procurement Details button  .
.
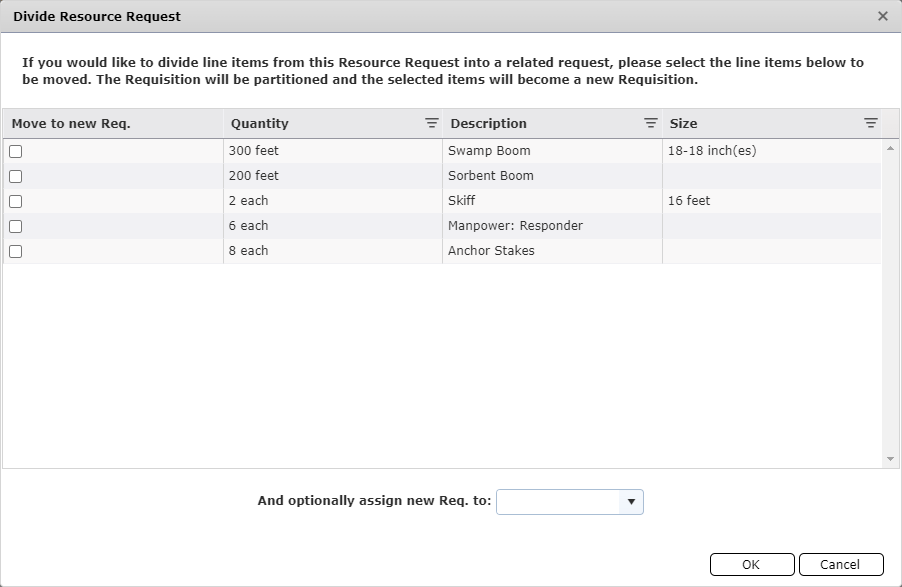
To split the request into two, click the Divide Request button  . The Divide Resource Request window will open. Select the items to be moved to the new request using the checkboxes
  provided. Use the drop-down to assign the new request to a member of the response team. Then click the OK button. The new request will open in a new tab. Both the original request and the split request will retain the original Resource Request Number but will also have an additional decimal point
  to indicate the division.
NOTE: If the Resource Unit Leader (RESL) indicates that some (or all) of the resources on the request are available within the incident using the checkbox  the available resources will already be present within the procurement section.
The Logistics section at the bottom of the form is used to document internal tracking and supplier contact information.

If applicable, enter the Internal Reference # (Or SAP #). For example, enter the organization's internal SAP order number.
Enter the Supplier Name/Phone/Fax/Email details.
Free type to enter any necessary Notes.
Use the radio buttons  provided to indicate by whom the order is being placed.
When complete, click Finished Ordering.  or use one of the signature options described in the Apply Signature section above to step back the request.
NOTE: After the Logistics/procurement step of the requisition has been completed the resources are added to the Resources Summary form.
The final step in completing a requisition is review by the Finance Section.
From the Requisition tab select a requisition with status Awaiting Finance Signature then click the Review button  within the Options menu. Begin with the procurement side (right-hand side) of the requisition.

Enter or edit the Unit Price, Unit Price UOM, check the Rental check box if the resource is being rented, and enter or edit the Equipment ID and Order Number.
Enter Reply/Comments from Finance, as necessary.

When complete, click Approve button  .The requisition status will now be Complete.
Users can subscribe to receive notifications as a requisition is moved through the review and approval process. Notifications will be distributed each time the requisition is updated or advanced within the approval process. Subscription for notification can be accomplished in two ways.
At the time of requisition signature by selecting the checkbox to Receive update notifications  at the designated email address. See the Apply Signatures section above for more details on this method of subscription.
From the Requisitions Grid using the Follow button  within the Options menu.
NOTE: Each requisition must be subscribed/unsubscribed to individually.
To receive notifications on a specified requisition user can subscribe to that requisition.
On the Requisitions grid select the requisition item to be followed.
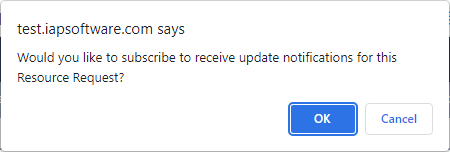
Click the Follow button  to subscribe to updates.
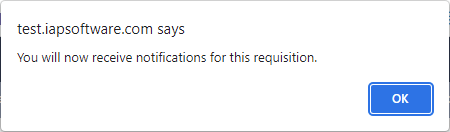
Confirm the subscription by clicking Ok on the pop-up window.
The system will confirm your subscription to the requisition.
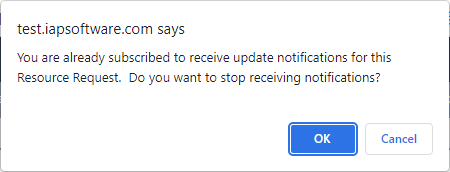
To discontinue notifications on a specified requisition user can unsubscribe.
Within the Requisitions grid select the requisition from which to unsubscribe.
Click the Follow button  .
.
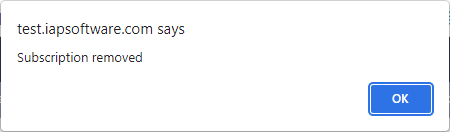
A pop-up message will confirm subscription to the selected item exists. Click OK.
A second pop-up message will confirm that the subscription has been removed for the requisition.
The All Requisition Details tab shows all of the individual resources requested for the incident, as well as information on who approved, reviewed and ordered resources on the requisition.
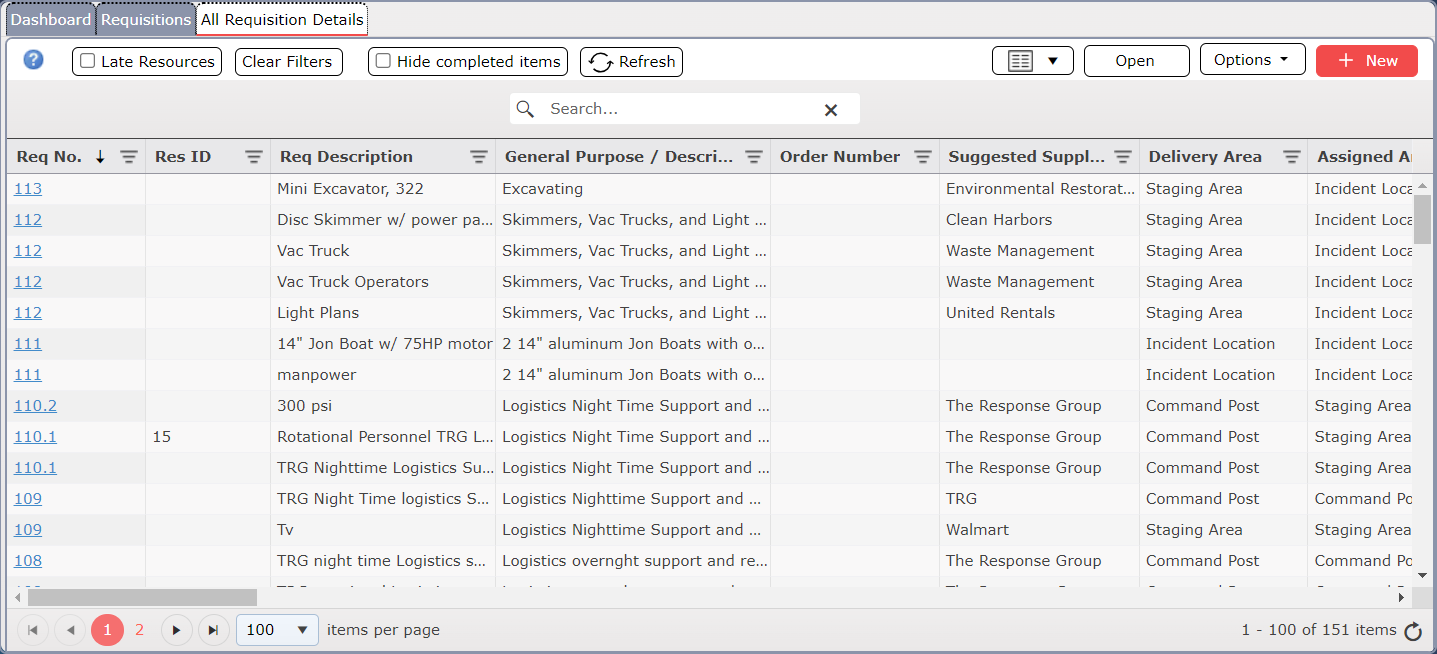
Many of the viewing/editing options across the top of the form are the same as those on the Requisitions tab. In addition to those features described above in the Requisition tab, the All Requisition Details has options to show Late Resources  , Clear Filters
  , and inside the Options dropdown, Print a Proof of Delivery Report
  or to Export
  the data.
Late Resources  indicate resources that were scheduled to arrive, but haven't for over 24hrs. Users can check this feature to focus on listing only these kind of resources.
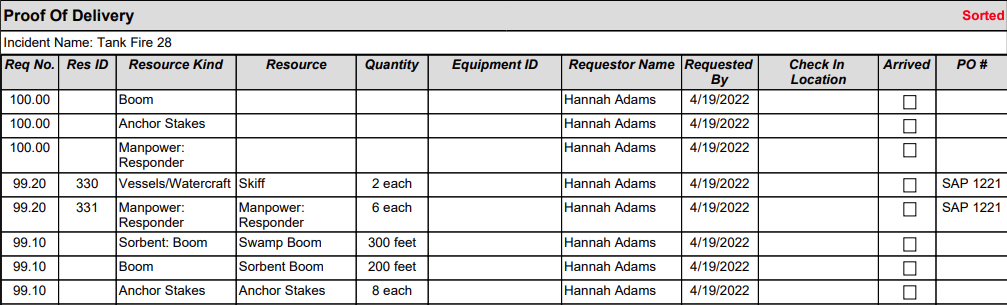
The Proof of Delivery report provides data that verifies the resources have been delivered and accepted for use at the incident. As the status is updated to Arrived or resources are checked in the POD report is automatically updated.
Filter the grid to show only the resources to be included on the POD report.
Click the Print POD button  to open a pdf version of the Proof of Delivery Report.
To clear the filters applied, click Clear Filters  .
.
It may be preferred to export the details of the All Requisition Details screen to an Excel file for further manipulation or record keeping purposes.
Filter the grid to show only the resources to be included on the exported file.
Click the Export button  to open the Export Data window.
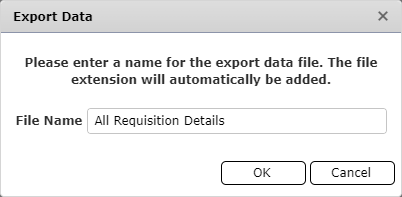
The file name will default to All Requisition Details. Rename the file, as necessary. Then click the OK button.
The file will download and can then be opened or saved to a preferred location.
© 2024, TRG The Response Group LLC., All rights are reserved.
No part of this web site, and the information which it contains, may be reproduced, stored in a retrieval system or transmitted in any form or by any means, electronic, mechanical, photocopying, recording or otherwise, without prior written permission of TRG.