| IAP Software ™ |  |
| IAP Software ™ | |
ICS 208 – Site Safety Plan
The Site Safety and Health Plan (ICS 208) is a site-specific document required by state and federal OSHA regulations. The ICS 208 is prepared in a safety checklist format to allow for a thorough assessment; it consists of free-type text fields, check boxes and drop-down lists to communicate the safety considerations for the sites. For help using general form functions (e.g. Create/Open Version, Save, etc.) and accessing preloaded versions, see the General Form Functions page.
Contents
Add Weather Via “Get Weather Data” Button
Add Weather via Get Data Button
Personal Protective Equipment Required
Additional Control Measures Established
Add Personnel Via “Get Data” Button
Identify Site Characterization as appropriate. This section of the form uses free-type text function, drop-down choices and up and down arrows.
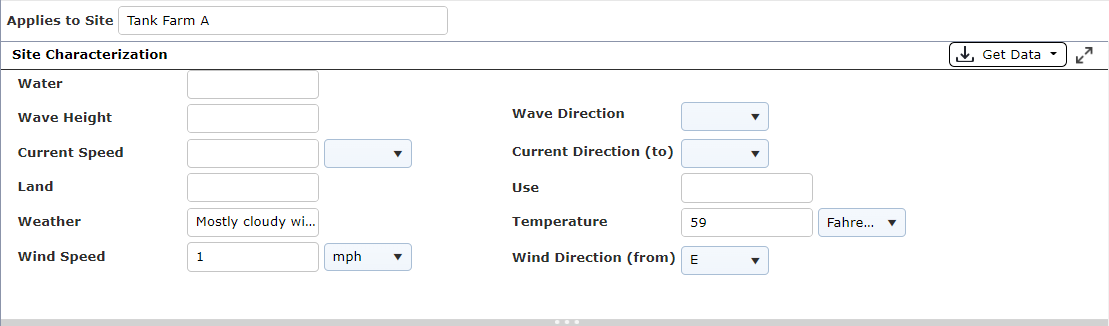
Weather information can be manually added to the form using free type and dropdown menu options.
Users can add weather information from the Weather Service with a one-time instant data pull by using the Get Weather Data button.
Weather conditions can be entered via the Get Weather Data button  .
.
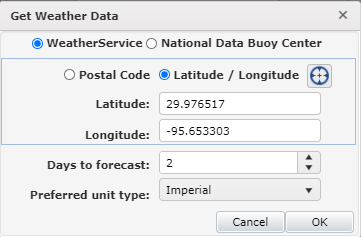
Select either WeatherServie or National Data Buoy Center by clicking on the appropriate radio button.
Click the Postal Code or Latitude/Longitude button, enter appropriate information.
Select how many Days to forecast.
Click on the dropdown for the Preferred unit type choose between Imperial or Metric
Click OK.
Weather data will populate in appropriate fields on the ICS 208.
Users can add weather information from an existing Weather Report by using the Get Data button.
Weather conditions can be pulled in from an existing Weather Report using the Get Data button  .
.
Select the version of the Weather Report from which to get weather data.
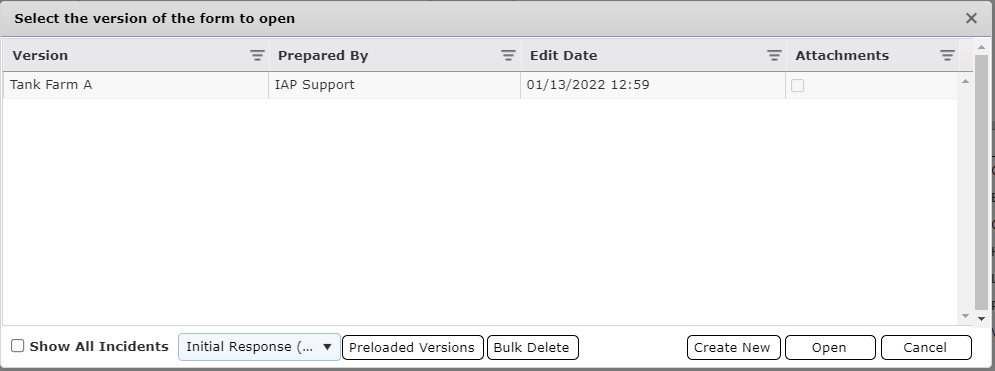
The weather data will populate from the version selected.

Identify and mark site hazards as appropriate by clicking on the checkbox.
NOTE: To add a new site hazard, click the Add button  . To remove a site hazard, select the line item and click the Remove button
  . The Remove button
  appears after a new item has been added.

Use the free-type text function to enter any air monitoring limits at the site.
NOTE: To add a new air monitoring limit, click the Add button  . To remove an air monitoring limit, click the Remove button
  . The Remove button
  appears after a new item has been added.

Identify and mark engineering controls as appropriate.
Note: To add a new engineering control, click the Add button  . To remove an engineering control, click the Remove button
  . The Remove button
  appears after a new item has been added.

Identify and mark Personal Protective Equipment (PPE) as appropriate.
NOTE: To add a new Personal Protective Equipment choice, click the Add button  . To remove a Personal Protective Equipment choice, click the Remove button
  . The Remove button
  appears after a new item has been added.

Identify and mark Additional Control Measures Established as appropriate.
NOTE: To add Additional Control Measures Established, click the Add button  . To remove an Additional Control Measures Established choice, click the Remove button
  . The Remove button
  appears after a new item has been added.

Identify and mark Work Plans as appropriate.
NOTE: To add a new Work Plan choice, click the Add button  . To remove a Work Plan choice, click the Remove button
  . The Remove button
  appears after a new item has been added.

This section includes the free-type text function to enter training requirements, along with the check box function to show verification requirements.

To add personnel, click the Add button  .
.
Use the dropdown function to select the name and position of personnel.
NOTE: If Personnel Details are in the database, the phone number will auto populate.
To add personnel by retrieving personnel identified on other forms, click the Get Data button  . For more information, see the Get Personnel Data page.
To remove a person, click on the desired line item, then click the Remove button  .
.

Identify and mark Emergency Plans as appropriate.
NOTE: To add a new Emergency Plan choice, click the Add button  . To remove an Emergency Plan choice, click the Remove button
  . The Remove button
  appears after a new item has been added.

The Notifications section is used to document notifications which have been made to emergency services.
This section is free-type text function to add a new service and phone number.
Select the appropriate check box to select the emergency services personnel that have been notified in the area.

In this section, select the checkbox to indicate if a safety briefing has been prepared for each site.
© 2024, TRG The Response Group LLC., All rights are reserved.
No part of this web site, and the information which it contains, may be reproduced, stored in a retrieval system or transmitted in any form or by any means, electronic, mechanical, photocopying, recording or otherwise, without prior written permission of TRG.
